Overview
contactHeRo is a contact management solution for recruiters across companies who need a quick and efficient way to manage the profiles of their potential recruits, current job openings and their appointments. It is a Command Line Interface(CLI) application with intuitive usage and effective features. You can manage details of prospective employees and job openings in your company through easy to use add, delete and edit features. Matching jobs to employees is also a great feature that makes the hiring process easy for you. Other than that, you can also view the linkedIn profiles of your potential employees, send emails and arrange meetings.
This portfolio is to collate my contributions towards the developing of contactHeRo. It showcases the software engineering knowledge I have learned during the course of CS2103T, as well as how I utilized this knowledge and applied it to a real-world project. This portfolio also contains some enhancements I would suggest to be developed for contactHeRo in the future.
Summary of contributions
-
Major enhancement: added job openings section
-
What it does: allows the user to maintain a list of current job openings using add, delete, find and edit commands and match these job openings to potential employees using skill-matching.
-
Justification: A recruiter needs the list of the job openings in the company so he/she knows what are the current job openings and what skillsets to look for in people. This way, the user can better search for potential employees. Hence, this feature is an essential feature of any recruitment-management software.
-
Highlights: This enhancement required the addition of six new commands, namely,
addjob,deletejob,editjob,findjob,listjobandmatchjob. New attributes, currentPosition and company were added to the Person which required hanges to existing commands likeaddandeditas well.
-
-
Minor enhancement: added a Details Panel Display including the Contact Details Display.
-
Code contributed: Functional code [Test code] {give links to collated code files}
-
Other contributions:
-
Took the role of Team Leader to make important decisions regarding development of product.
-
Auto-complete: added functionality for commands to be auto-completed on pressing
TABPull request #35, Pull request #186 -
Project management:
-
Managed all releases
v1.3-v1.5on GitHub -
Managed all milestones
v1.1-v1.5(6 milestones) on GitHub -
Managed project effectively to keep track of issues, merging pull requests by resolving conflicts and keeping track of deadlines and deliverables.
-
-
Enhancements to existing features:
-
Added curentPosition and company attributes to Person Pull request #118
-
Improved the UI of the application Commit #7b9ac8
-
-
Documentation:
-
Made User Guide more reader-friendly by adding screenshots and organising features into sections: Pull request #114, Pull request #217
-
Organised the Command Summary in a table format to ensure better readability Pull request #235
-
-
Community:
-
PRs reviewed (with non-trivial review comments): Pull request #173, Pull request #55, Pull request #152,
-
Reported bugs and suggestions for other teams in the class (examples: Issue #85, Issue #95, Issue #69, Issue #76, Issue #83)
-
-
Contributions to the User Guide
Given below are sections I contributed to the User Guide. They showcase my ability to write documentation targeting end-users. |
Managing Job Openings
This section describes the commands you can use to manage jobs in contactHeRo.
Adding a job opening: addjob
You can add a job opening to contactHeRo using the following format.
Format: addjob p/POSITION t/TEAM l/LOCATION n/NUMBER_OF_POSITIONS s/SKILL_REQUIRED…
Examples:
-
addjob p/Software Engineer t/Cloud Services l/Singapore n/1 s/JavaOn running the above command, you should see the following success message:
New job opening added: Software Engineer Team: Cloud Services Location: Singapore Number of Positions: 1 Skills: [Java]
-
addjob p/Marketing Intern t/Social Media Marketing l/Kuala Lampur, Malaysia n/1 s/Excel s/WritingOn running the above command, you should see the following success message and the job opening UI(Refer to figure 7) added to the Job List Panel(Refer to figure 3):
New job opening added: Marketing Intern Team: Social Media Marketing Location: Kuala Lampur, Malaysia Number of Positions: 1 Skills: [Excel][Writing]

Editing a job opening : editjob
You can edit an existing job opening in contactHeRo using this format.
Format: editjob INDEX [p/POSITION] [t/TEAM] [l/LOCATION] [n/NUMBER_OF_POSITIONS] [s/SKILL]…
Examples:
-
editjob 1 p/Hardware Engineer t/Hardware Products
Edits the position and team of the 1st job opening to beHardware EngineerandHardware Productsrespectively.On running the above command, you should see the following success message:
Edited Job: Hardware Engineer Team: Hardware Products Location: Singapore Number of Positions: 1 Skills: [Java]
Locating job opening by position, location or skill : findjob
You can find all the persons whose names or skills contain any of the given keywords using the following format.
Format:
-
findjob p/KEYWORD [MORE_KEYWORDS]to find by position or -
findjob s/KEYWORD [MORE_KEYWORDS]to find by skill or -
findjob l/KEYWORD [MORE_KEYWORDS]to find by location.
Some things to take note of:
Examples:
-
findjob p/Hardware Engineer
This will show any job with positionHardware Engineer. -
findjob s/Java
This will show any job which requires Java. -
findjob l/Singapore
This will show any job in Singapore.
Listing all job openings : listjob
You can see a list of all job openings in contactHeRo using the following format.
Format: listjob
Deleting a job opening: deletejob
You can delete a specified job opening from contactHeRo using the following format.
Format: deletejob INDEX
Examples:
-
listjob
deletejob 2
This deletes the 2nd job opening in contactHeRo and on running the above command, you should see the following success message:Deleted Job: Marketing Intern Team: Social Media Marketing Location: Kuala Lampur, Malaysia Number of Positions: 1 Skills: [Excel][Writing]
Matching a job opening to a person: matchjob
You can see potential candidates for a specified job opening in contactHeRo using the following format.
Format: matchjob INDEX
Examples:
-
list
matchjob 1
This will show any person whose skills match any of those required for the job opening at index 1. -
findjob s/Software
matchjob 1
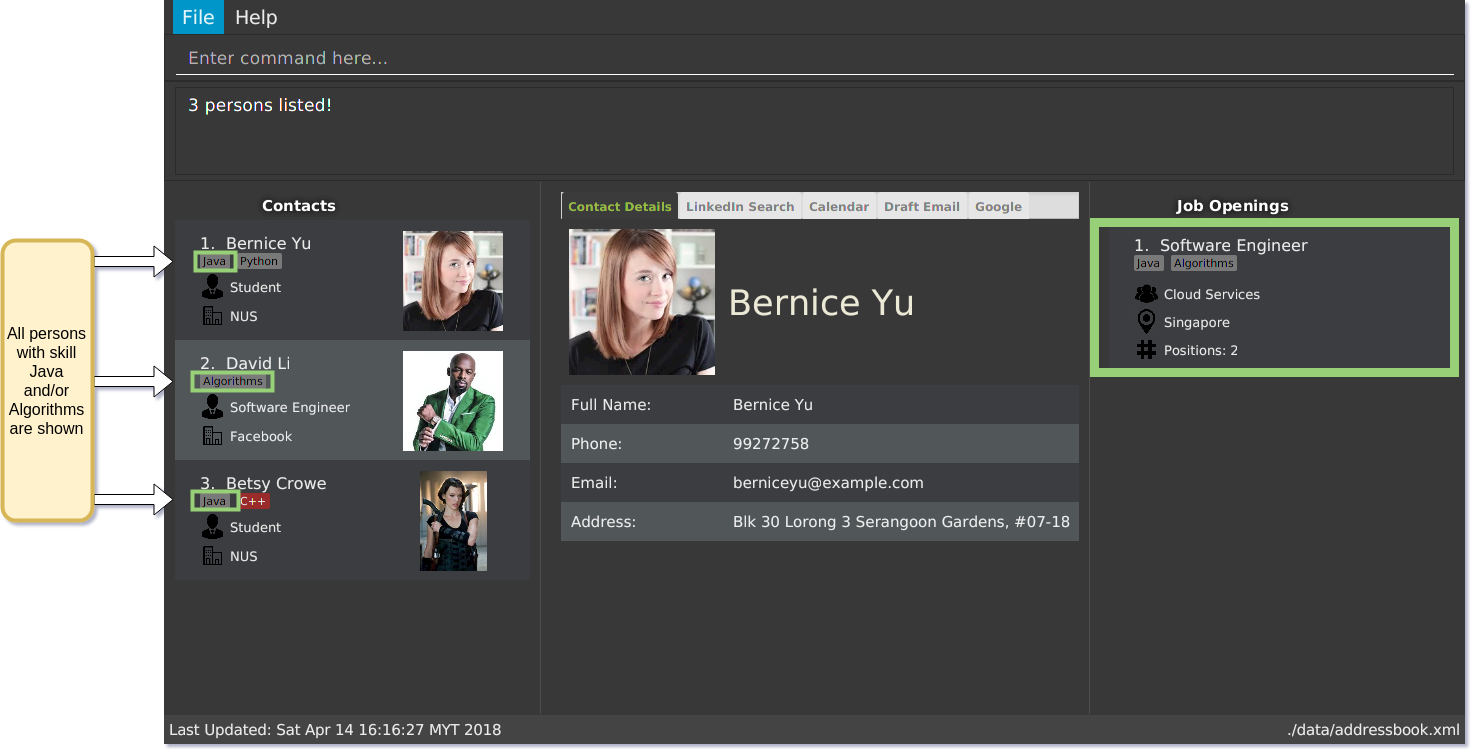
This will show any person whose skills match any of those required for the job opening at index 1 in the results of the findjob command.On running this command, you should see a similar result as the following (Refer to figure 8). All persons having any skill as required by the job 'Software Engineer' will be shown.
Auto-complete command
To save your time, after typing a partial command, you can press TAB for the command to be auto-completed.
| The first lexicographically matched command is returned. |
Examples:
-
Typing
adand pressingTABgives:
add n/ e/ a/ [s/]… -
Typing
hand pressingTABgives:
help
Searching a person on LinkedIn: linkedIn
You can select a person identified by the index number used in the last person listing to search him/her on LinkedIn using the following format.
Format: linkedIn INDEX
| We do not save or log any of your LinkedIn credentials or information as we respect your privacy. Therefore, everytime you restart contactHeRo, you will have to login again. |
Examples:
-
list
linkedIn 2
This loads the LinkedIn search of the 2nd person in the contactHeRo. -
find n/Betsy
linkedIn 1
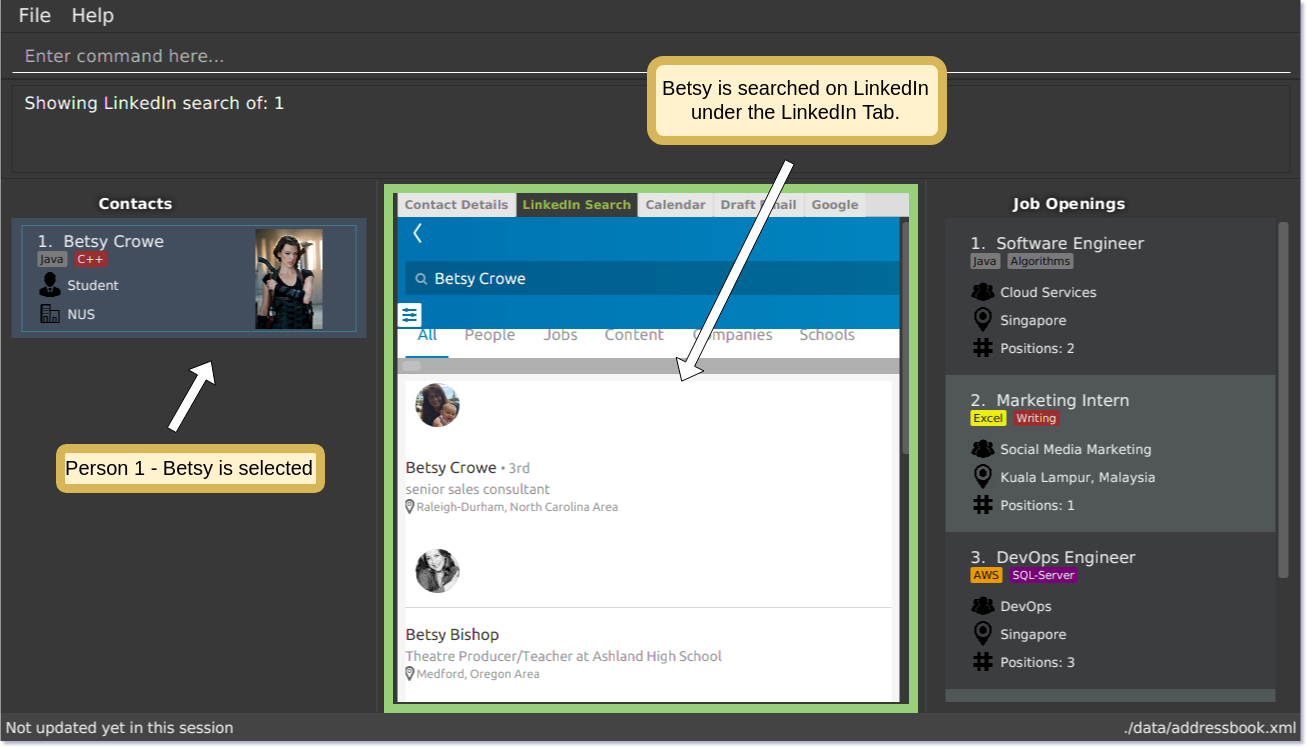
This loads the LinkedIn search of 1st person in the results of thefindcommand.On running the above command and after you have logged in, you should a similar result as the following (Refer to figure 6). Betsy is selected in the person list and she is searched on LinkedIn in the LinkedIn Tab.
Setting reminders [coming in v2.0]
You will soon be able to set reminders for meetings, appointments or any other event and contactHeRo will remind you of the event.
Better matching of jobs [coming in v2.0]
Job matching will soon be improved using Artificial Intelligence methods.
Contributions to the Developer Guide
Given below are sections I contributed to the Developer Guide. They showcase my ability to write technical documentation and the technical depth of my contributions to the project. |
Details Panel Implementation
Given below is the implementation detail of the Details Panel and some alternative design considerations.
Current Implementation
DetailsPanel is a TabPane which consists of the following tabs:
The select command shows the contact details of the person at the specified index under the Contact Details tab.
The ContactDetailsDisplay is a GridPane embedded in the Contact Details tab and the UML diagram below represents the UI structure for the ContactDetailsPanel (Refer to Figure 30):

The DetailsPanel also comes into play when the user manually clicks on the PersonCard and the panel corresponding Contact Details or LinkedIn is currently shown. This is implemented by handling the PersonPanelSelectionChangedEvent in both the ContactDetailsPanel and the BrowserPanel.
Both the select and linkedIn command function quite similarly and only differ in the tabs that they trigger.
|
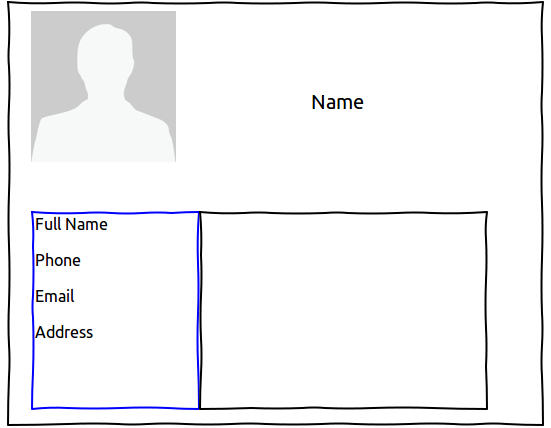
The figure below (Refer to figure 31) is the wireframe for the ContactDetailsDisplay:
Design Considerations
Aspect: Improving the UI
Alternative 1 (current choice): Show the extra details of contact after they are selected.
Pros: Allows more readability of the contact details and since other attributes like Current Position and Company have been added to the Person class, too much information would make the PersonCard cluttered.
Cons: User needs to manually select the user to see the contact details of that person.
Alternative 2: Show the contact details of the person only in the PersonCard.
Pros: User only has to look in the PersonCard for any and every detail
Cons: Looks very cluttered and has poor User Interface design.
Alternative 3 : Show all the tabs as completely independent windows.
Pros: Completely isolates the UI for different commands like select and linkedIn and provides more focus.
Cons: In the current implementation one window is easily accessible from another, just by manually switching tabs which would not be possible with this alternative since the user would have to run many different commands to do this.
Tab Switching Mechanism
Given below is the implementation detail of the Tab Switching Mechanism and some alternative design considerations.
Current Implementation
Tab Switching Mechanism is an event driven mechanism.
The above diagram (Refer to Figure 13) shows the high-level overview of the component interactions for the tab switching mechanism. We use the event, SwitchTabRequestEvent which sets the current tab in the DetailsPanel to one of five tabs below depending on the input command.
The code for the SwitchTabRequestEvent event is as follows.
public class SwitchTabRequestEvent extends BaseEvent {
    public final int tabId;
    public SwitchTabRequestEvent(int tabId) {
        this.tabId = tabId;
    }
    @Override
    public String toString() {
        return this.getClass().getSimpleName();
    }
}
The SwitchTabRequestEvent has an integer attribute tabId. The event handlers use this tabId to switch between tabs wherein the tabs Contact Details, LinkedIn Search, Calendar, Draft Email and `Google`have tabIds 0, 1, 2, 3 and 4 respectively.
|
Let us look at an execution example for the LinkedIn Command.
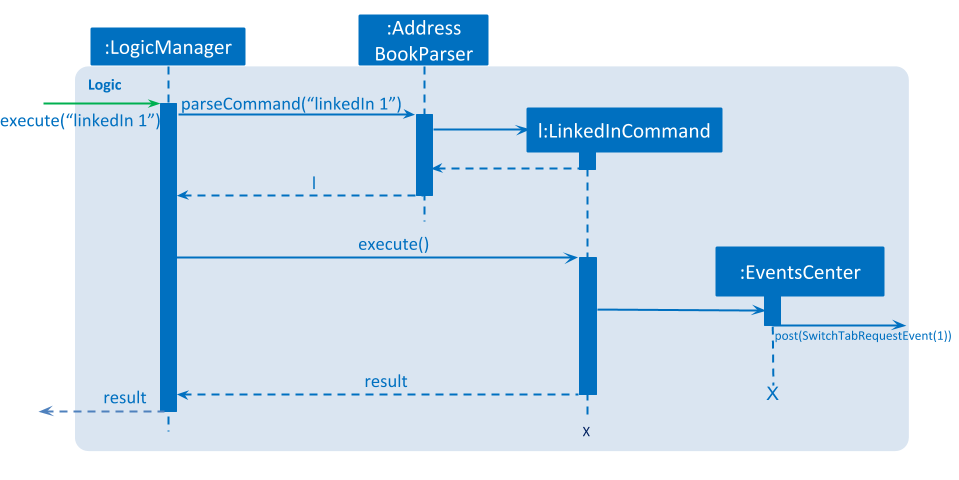
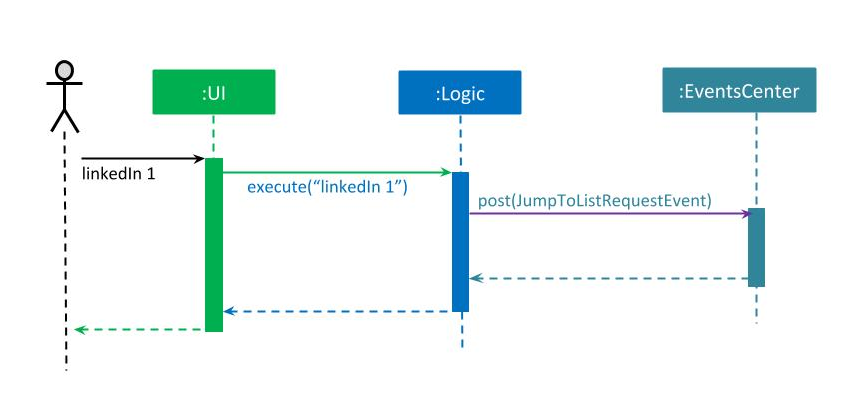
As seen from the sequence diagram above (Refer to Figure 14), when the user types the linkedIn command, an instance of LinkedInCommand would be created and upon execution by LogicManager, the event SwitchTabRequestEvent would be posted by the EventCenter to the EventBus:
public class LinkedInCommand extends Command {
    @Override
    public CommandResult execute() throws CommandException {
        //... other execution statements
        EventsCenter.getInstance().post(new SwitchTabRequestEvent(TAB_ID_LINKEDIN));
        //... other execution statements
    }
    ...
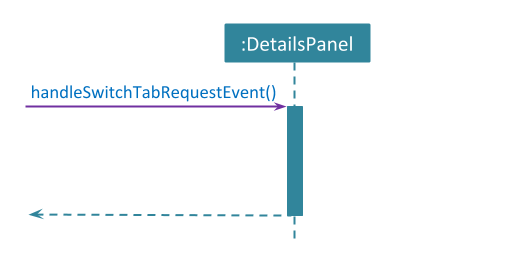
DetailsPanel class in the UI component has the handleSwitchTabRequestEvent() method which listens for the event. Upon receiving the event, it switches the tab depending on the tabId passed to the event.
public class DetailsPanel extends UiPart<Region> {
    @Subscribe
    private void handleSwitchTabRequestEvent(SwitchTabRequestEvent event) {
        logger.info(LogsCenter.getEventHandlingLogMessage(event));
        tabPane.getSelectionModel().clearAndSelect(event.tabId);
    }
    ...
Shown below is the sequence diagram for the above implementation (Refer to figure 15).
Design Considerations
Aspect: Implementation
Alternative 1 (current choice): Use event driven mechanism.
Pros: Event is only handled in the DetailsPanel and not in the Command itself hence decreasing coupling between the UI and Logic.
Cons: Tab switching is a hidden mechanism and might not be intuitive to certain users.
Alternative 2: Switch tab in the command execution itself.
Pros: .
Cons: The TabPane will have to be accessible to the logic which will increase coupling.
Job Openings Implementation
Given below is the implementation detail of the Job Openings feature and some alternative design considerations.
Current Implementation
The Job object represents a job opening in contactHeRo. It contains Position, Team, Location and NumberOfPositions objects and a set of Skills, which represent the position, team, location, the number of available positions and the required skills for the job opening respectively (Refer to Figure 12).
All fields mentioned above are compulsory for the Job object unlike the Person where skill is optional.
|
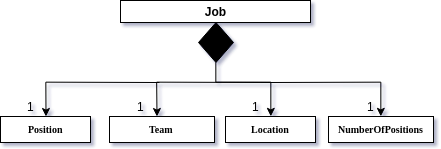
In addition to the above attributes, the Job object also contains a set of Skills which denote the skills required for the job opening.
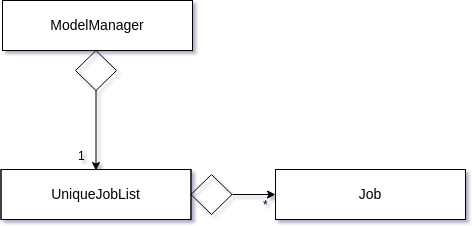
Job objects are kept in-memory during the running of contactHeRo. A UniqueJobList is maintained which contains the Job (Refer to Figure 13) and assures that there are no duplicate Job objects. The UniqueJobList object is then kept and used by ModelManager to carry out commands related to job openings.
The storage of job openings is very similar to that of the persons. Job objects are stored in a XML storage file in a JAXB-friendly version XmlAdaptedJob. When the program starts, XmlAdaptedJob objects are read in as jobs in the XmlSerializableAddressBook via XmlFileStorage.
The job openings management is facilitated by several command classes in contactHeRo, namely:
The implementation of these commands is quite similar to the equivalent operations in the Person class. Let us look at JobAddCommand as an example.
Adding Job Openings
Adding job openings is facilitated by the JobAddCommand. Execution of this command adds a Job Object to contactHeRo with the input Position, Team, Location, NumberOfPositions and Skills.
Given below is the sequence diagram for addition of a job opening.
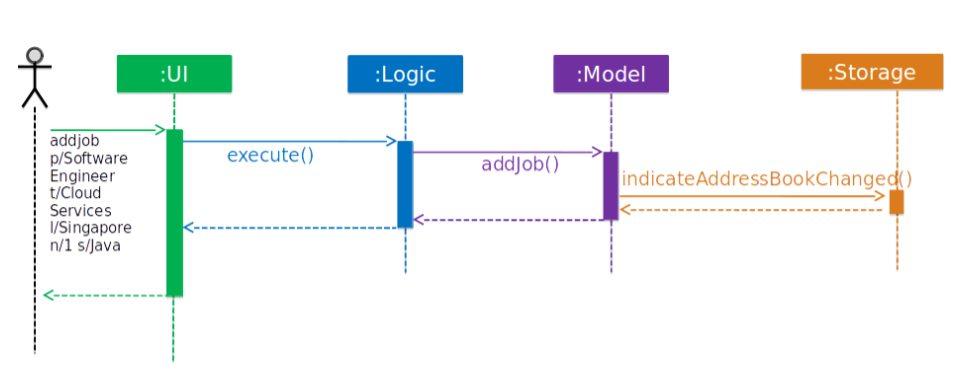
The following snippet shows how the executeUndoableCommand() method updates the model of the application by adding the job to the list of jobs.
public class JobAddCommand extends UndoableCommand {
    @Override
    public CommandResult executeUndoableCommand() throws CommandException {
        requireNonNull(model);
        try {
            model.addJob(toAdd);
            return new CommandResult(String.format(MESSAGE_SUCCESS, toAdd));
        } catch (DuplicateJobException e) {
            throw new CommandException(MESSAGE_DUPLICATE_JOB);
        }
    }
    ...
}
The job openings are displayed towards the right side of the UI in the JobListPanel.
Design Considerations
Aspect: Storing job openings
Alternative 1 (current choice): Use the same file to store jobs and persons.
Pros: Certain jobs and persons may have the same skills and in the current implementation there will not be any duplicates in the data file, thus saving memory.
Cons: Different types of data in the same file.
Alternative 2: Use different files to store jobs and persons.
Pros: Data is segregated by type.
Cons: Certain jobs and persons may have the same skills and in this implementation, there might be duplicate skills having one copy in each file.
Matching jobs mechanism
The JobMatchCommand uses PersonSkillContainsKeywordsPredicate to match person’s skills with a job’s skills. It accepts the index for the job to match and then uses the PersonSkillMatchesKeywordsPredicate to match the job. Below is the code for the execution of the JobMatchCommand:
@Override
public CommandResult execute() throws CommandException {
    ...
    Job jobToMatch = lastShownList.get(targetIndex.getZeroBased());

    model.updateFilteredPersonList(new PersonSkillContainsKeywordsPredicate(
            CollectionUtil.getSetAsStringList(jobToMatch.getSkills())));
    // return result
}
PersonSkillMatchesKeywordsPredicate takes in the list of skills of the job as the keywords as the parameter and then checks if the person has any of these skills using the SkillUtil. The code for matching the skills is as follows:
/**
 * Checks if a set of skills contains any of the {@code keywords}.
 */
public static boolean match(List<String> keywords, Set<Skill> list) {
    String skillList = getSkillsAsString(list);
    return keywords.stream()
            .anyMatch(keyword -> StringUtil.containsWordIgnoreCase(skillList, keyword));
}
To minimize code duplication, we made a utility class SkillUtil which is used both by PersonSkillMatchesKeywordsPredicate during execution of matchjob and find s/ commands and JobSkillMatchesKeywordsPredicate during the execution of findjob s/ command.
|
Auto-complete Mechanism
The auto-complete mechanism is implemented in the CommandBox in the UI component. We check the key pressed by the user and if it is the Tab key, the auto-complete mechanism is triggered.
Given below is are the activity diagram (Refer to figurue 20) for the mechanism.
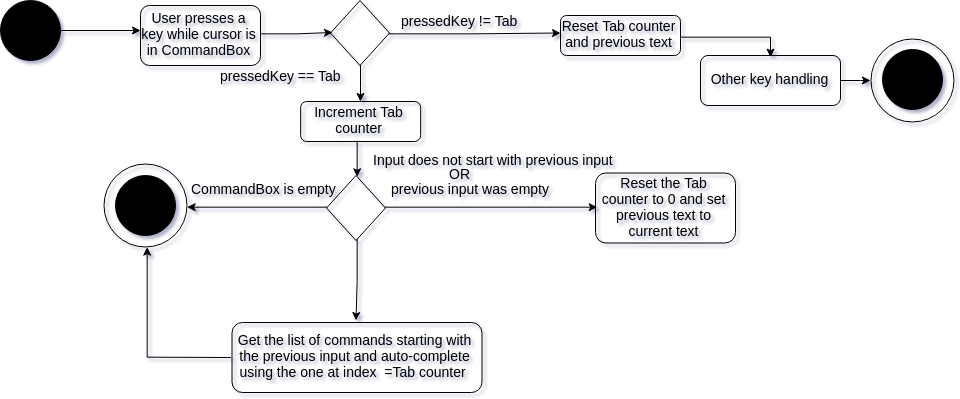
The previous input and tab Counter are recorded to account for cases where more than one command share the same
prefix. For e.g. the add, addjob and addapp commands share the common add. In such a case, the user can just
type a or ad or add and press Tab multiple times to cycle between these commands which will keep incrementing
the Tab counter, tabNumber in a cyclic manner.
Target users:
The application is targeted towards Human Resources Managers at companies, especially those responsible for recruitment. Such recruiters have a lot of contacts to
manage which include contact details and profiles of potential employees, job openings and appointments.
It is essential for them to have a quick and easy access to these contacts. Hence, contactHero aims to make their lives easier by helping them to store and manage their contacts efficiently.
Proposed Enhancement: Include interviewing process
This feature will transform contactHeRo from a contact management solution to a hiring manager for the recruiter. They will be able to set interview questions and metrics and grade and analyse candidates based on the results.