Overview
contactHeRo is a desktop contact management application for recruiters across companies who need a quick and efficient way to manage the contact details and profiles of their potential recruits. It is a Command Line Interface(CLI) application with several useful features such as a login system, email system, a view linkedIn profile feature as well as an in-built calendar.
This portfolio is to collate my contributions to this project as well as showing my developments in software engineering skills which I have learned from CS2103T.
Summary of contributions
-
Major enhancement: added the login system in contactHeRo.
-
What it does: provides security for the user’s data.
-
Justification: Recruiters are dealing with data of their potential employees and some of these data are personal and sensitive. Recruiters may also have some confidential company data stored in the application. Hence it is necessary for them to set up some form of security to protect these sensitive data. Having a login system is one of the common methods to ensure data security.
-
Highlights: This enhancement provides a foundation for other security measures to be implemented in contactHeRo in the future to further help users in securing their important data.
-
Credits: stackoverflow.com.
-
-
Minor enhancement: added the ability to clear history of user input.
-
What it does: It allows the user erase the past commands which was inputted in the command line.
-
Justification: As our app only uses one command line interface for all user input and it comes with a history command which lets the user see the list previously entered commands, this may expose some of the sensitive data which the user has inputted, like login username and password. Hence being able to clear away the history of user inputs can help to protect those sensitive information.
-
Highlights: This was one of my first enhancement to the project and it helped me get familiarise with the logic component of the code.
-
-
Code contributed: [Functional code] [Test code]
-
Other contributions:
-
Project management:
-
Reach the milestones
v1.1-v1.3rcandv1.5rc - 1.5on GitHub. -
Created issues and milestones for the team.
-
-
Contributions to the User Guide
Given below are sections I contributed to the User Guide. They showcase my ability to write documentation targeting end-users. |
Logging in : login
You can login via the command line using the following format.
Format: login u/USERNAME pw/PASSWORD
Examples:
-
login u/JohnDoe pw/doe123On running the above command, you should see the following success message:
You have successfully logged in as JohnDoe
Logging out : logout
You can logout via the command line using the following this format.
Format: logout
On running this command, you should see the following success message:
You have logged out successfully!
Changing your username : updateusername
You can change your username by using the following format.
Format: updateusername u/NEWUSERNAME
Examples:
-
updateusername u/JohnDoeOn running the above command, you should see the following success message:
You have successfully changed your username to JohnDoe
Changing your password : updatepassword
You can change your password by using the following format.
Format: updatepassword pw/OLDPASSWORD npw/NEWPASSWORD
Examples:
-
updatepassword pw/Doe123 npw/doe456On running the above command, you should see the following success message:
You have successfully updated your password!
Managing Persons
This section describes the commands you can use to manage person profiles in contactHeRo.
Adding a person : add
You can add a person to contactHeRo using the following format.
Format: n/NAME p/PHONE e/EMAIL a/ADDRESS cp/CURRENT_POSITION cc/COMPANY [pp/PROFILE_PICTURE_PATH] [s/SKILL]…
| A person can have any number of skills (including 0) |
| Profile Picture indicates the profile picture’s file path |
Examples:
-
add n/John Doe p/98765432 e/johnd@example.com a/John street, block 123, #01-01 cp/Software Engineer cc/GoogleOn running the above command, you should see the following success message:
New person added: John Doe Phone: 98765432 Email: johnd@example.com Address: John street, block 123, #01-01 Current Position: Software Engineer Company: Google Skills:
-
add n/Betsy Crowe s/Java e/betsycrowe@example.com a/Newgate Prison p/1234567 cp/Student cc/NUS s/C++On running the above command, you should see the following success message:
New person added: Betsy Crowe Phone: 1234567 Email: betsycrowe@example.com Address: Newgate Prison Current Position: Student Company: NUS Skills: [C++]
Editing a person : edit
You can edit an existing person in contactHeRo using this format.
Format: edit INDEX [n/NAME] [p/PHONE] [e/EMAIL] [a/ADDRESS] [cp/CURRENT_POSITION] [cc/COMPANY] [pp/PROFILE_PICTURE_PATH][s/SKILL]…
Examples:
-
edit 1 p/91234567 e/johndoe@example.com
Edits the phone number and email address of the 1st person to be91234567andjohndoe@example.comrespectively.On running the above command, you should see the following success message:
Edited Person: John Doe Phone: 91234567 Email: johndoe@example.com Address: John street, block 123, #01-01 Current Position: Software Engineer Company: Google Skills:
-
edit 2 n/Betsy Crower s/
Edits the name of the 2nd person to beBetsy Crowerand clears all existing skills.On running the above command, you should see the following success message:
Edited Person: Betsy Crower Phone: 1234567 Email: betsycrowe@example.com Address: Newgate Prison Current Position: Student Company: NUS Skills:
Listing all persons : list
You can see a list of all persons in contactHeRo using the following format.
Format: list
Locating persons by name or skill : find
You can find all the persons whose names or skills contain any of the given keywords using the following format.
Format: find n/KEYWORD [MORE_NAME_KEYWORDS] to find by name or find s/KEYWORD [MORE_SKILL_KEYWORDS] to find by skill
Examples:
-
find n/John
This will show any person having the namejohnorJohn. -
find s/designer
This will showJane Doewhose skill isdesigner. -
find n/Betsy Tim John
This will show any person having any of the namesBetsy,Tim, orJohn.
Deleting a person : delete
You can delete a specified person from contactHeRo using the following format.
Format: delete INDEX
Examples:
-
list
delete 1
This deletes the 1st person in contactHeRo and on running the above command, you should see the following success message:Deleted Person: John Doe Phone: 98765432 Email: johnd@example.com Address: John street, block 123, #01-01 Current Position: Software Engineer Company: Google Skills:
-
find n/Betsy
delete 1
This deletes the 1st person in the results of thefindcommand and on running the above command, you should see the following success message:Deleted Person: Betsy Crower Phone: 1234567 Email: betsycrowe@example.com Address: Newgate Prison Current Position: Student Company: NUS Skills:
Viewing the contact details of a person: select
You can select a person identified by the index number used in the last person listing to view his/her contact details using the following format.
Format: select INDEX
Examples:
-
list
select 2
This selects the 2nd person in contactHeRo. -
find n/Betsy
select 1
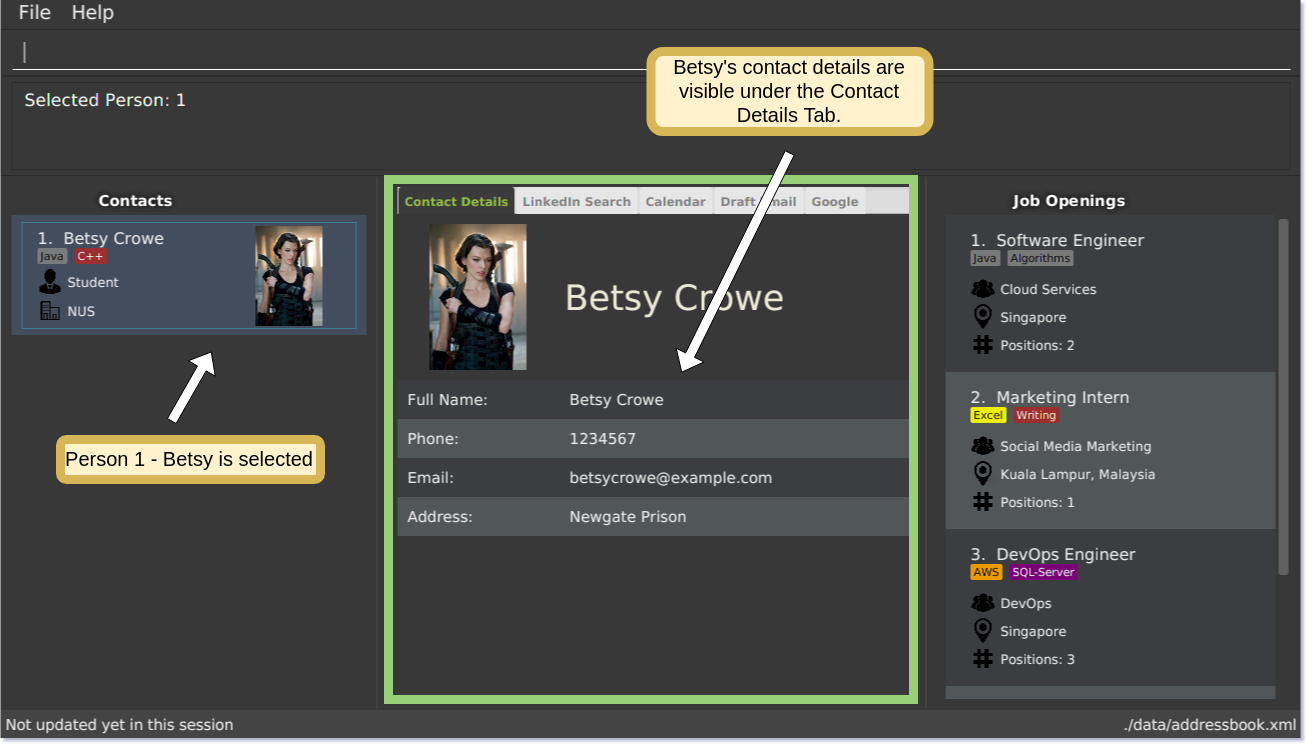
This selects the 1st person in the results of thefindcommand.On running this command, you should see a similar result as the following (Refer to figure 5). Betsy is selected in the person list and her contact details are visible in the Contact Details Tab.
Searching a person on LinkedIn: linkedIn
You can select a person identified by the index number used in the last person listing to search him/her on LinkedIn using the following format.
Format: linkedIn INDEX
| We do not save or log any of your LinkedIn credentials or information as we respect your privacy. Therefore, everytime you restart contactHeRo, you will have to login again. |
Examples:
-
list
linkedIn 2
This loads the LinkedIn search of the 2nd person in the contactHeRo. -
find n/Betsy
linkedIn 1
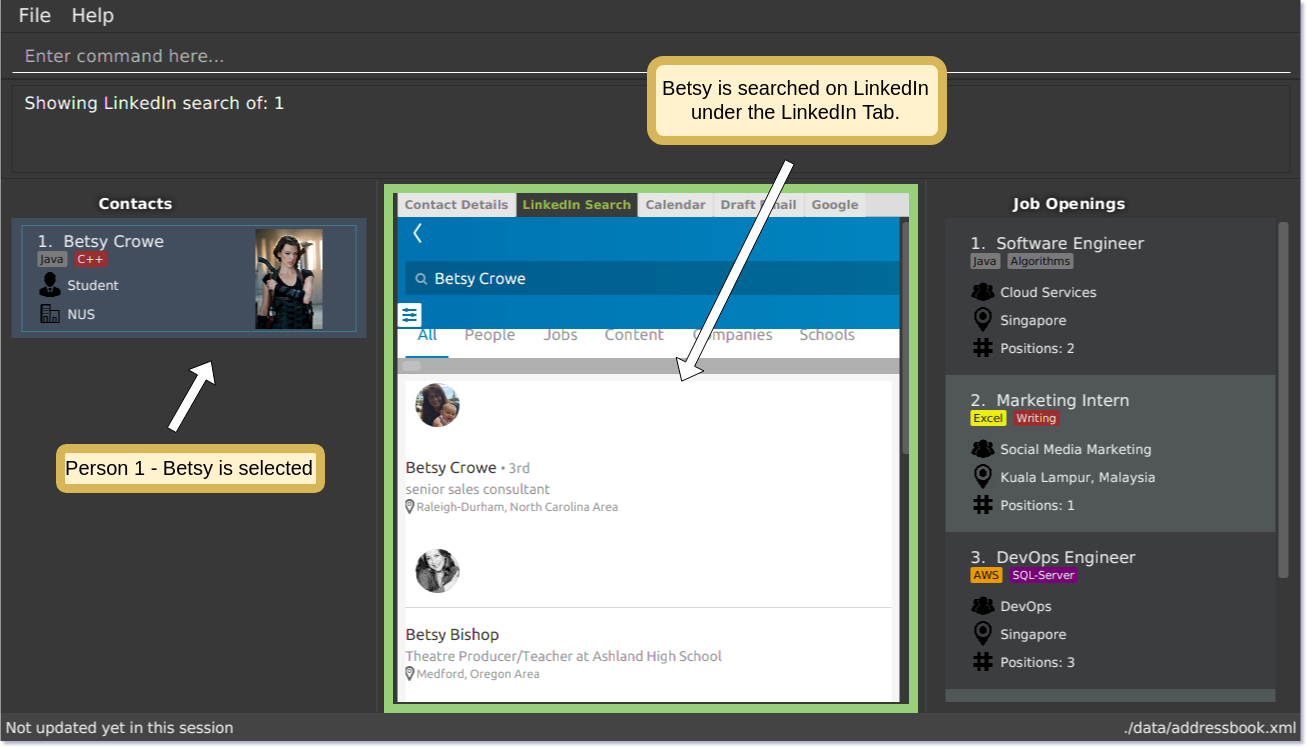
This loads the LinkedIn search of 1st person in the results of thefindcommand.On running the above command and after you have logged in, you should a similar result as the following (Refer to figure 6). Betsy is selected in the person list and she is searched on LinkedIn in the LinkedIn Tab.
Managing Job Openings
This section describes the commands you can use to manage jobs in contactHeRo.
Adding a job opening: addjob
You can add a job opening to contactHeRo using the following format.
Format: addjob p/POSITION t/TEAM l/LOCATION n/NUMBER_OF_POSITIONS s/SKILL_REQUIRED…
Examples:
-
addjob p/Software Engineer t/Cloud Services l/Singapore n/1 s/JavaOn running the above command, you should see the following success message:
New job opening added: Software Engineer Team: Cloud Services Location: Singapore Number of Positions: 1 Skills: [Java]
-
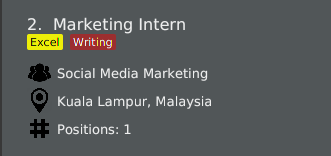
addjob p/Marketing Intern t/Social Media Marketing l/Kuala Lampur, Malaysia n/1 s/Excel s/WritingOn running the above command, you should see the following success message and the job opening UI(Refer to figure 7) added to the Job List Panel(Refer to figure 3):
New job opening added: Marketing Intern Team: Social Media Marketing Location: Kuala Lampur, Malaysia Number of Positions: 1 Skills: [Excel][Writing]
Editing a job opening : editjob
You can edit an existing job opening in contactHeRo using this format.
Format: editjob INDEX [p/POSITION] [t/TEAM] [l/LOCATION] [n/NUMBER_OF_POSITIONS] [s/SKILL]…
Examples:
-
editjob 1 p/Hardware Engineer t/Hardware Products
Edits the position and team of the 1st job opening to beHardware EngineerandHardware Productsrespectively.On running the above command, you should see the following success message:
Edited Job: Hardware Engineer Team: Hardware Products Location: Singapore Number of Positions: 1 Skills: [Java]
Locating job opening by position, location or skill : findjob
You can find all the persons whose names or skills contain any of the given keywords using the following format.
Format:
-
findjob p/KEYWORD [MORE_KEYWORDS]to find by position or -
findjob s/KEYWORD [MORE_KEYWORDS]to find by skill or -
findjob l/KEYWORD [MORE_KEYWORDS]to find by location.
Some things to take note of:
Examples:
-
findjob p/Hardware Engineer
This will show any job with positionHardware Engineer. -
findjob s/Java
This will show any job which requires Java. -
findjob l/Singapore
This will show any job in Singapore.
Listing all job openings : listjob
You can see a list of all job openings in contactHeRo using the following format.
Format: listjob
Deleting a job opening: deletejob
You can delete a specified job opening from contactHeRo using the following format.
Format: deletejob INDEX
Examples:
-
listjob
deletejob 2
This deletes the 2nd job opening in contactHeRo and on running the above command, you should see the following success message:Deleted Job: Marketing Intern Team: Social Media Marketing Location: Kuala Lampur, Malaysia Number of Positions: 1 Skills: [Excel][Writing]
Matching a job opening to a person: matchjob
You can see potential candidates for a specified job opening in contactHeRo using the following format.
Format: matchjob INDEX
Examples:
-
list
matchjob 1
This will show any person whose skills match any of those required for the job opening at index 1. -
findjob s/Software
matchjob 1
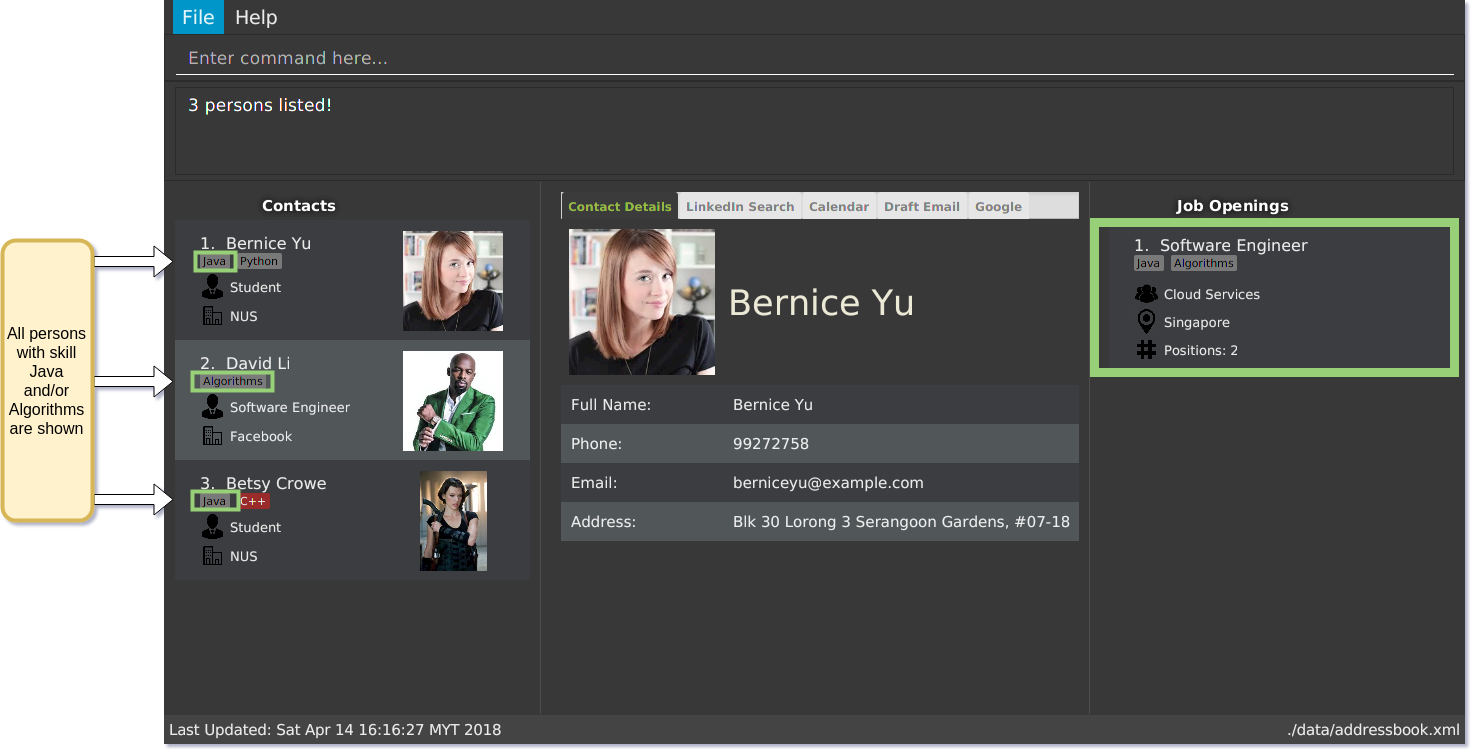
This will show any person whose skills match any of those required for the job opening at index 1 in the results of the findjob command.On running this command, you should see a similar result as the following (Refer to figure 8). All persons having any skill as required by the job 'Software Engineer' will be shown.
Managing Appointments
This section describes the commands you can use to manage appointments in contactHeRo.
Adding appointment : addapp
You can add appointment using the following format.
Format: addapp t/TITLE sdt/START_DATE_TIME edt/END_DATE_TIME
Examples:
-
addapp t/Meeting sdt/2018-04-05 14:00 edt/2018-04-05 15:00On running the above command, you should see the following success message:
New appointment added: Meeting Start Date Time: 2018-04-05 14:00 End Date Time: 2018-04-05 15:00
Deleting appointment : delapp
You can delete appointment using the following format.
Format: delapp t/TITLE sdt/START_DATE_TIME edt/END_DATE_TIME
Examples:
-
delapp t/Meeting sdt/2018-04-05 14:00 edt/2018-04-05 15:00On running the above command, you should see the following success message:
Appointment deleted: Meeting Start Date Time: 2018-04-05 14:00 End Date Time: 2018-04-05 15:00
Viewing the Calendar
This section describes the commands you can use view the calendar in contactHeRo.
Opening the calendar: calendar
You can switch to the calendar tab using the following format.
Format: calendar
Viewing a specific date or switch to the date view: date
You can view a specifc date or switch to the date view by using the following format.
Format: date [DATE]
DATE needs to be in format YYYY-MM-DD
|
-
With
DATE, you view the specific date
Example:date 2018-04-26 -
Without
DATE, you change to the date view
Example:date
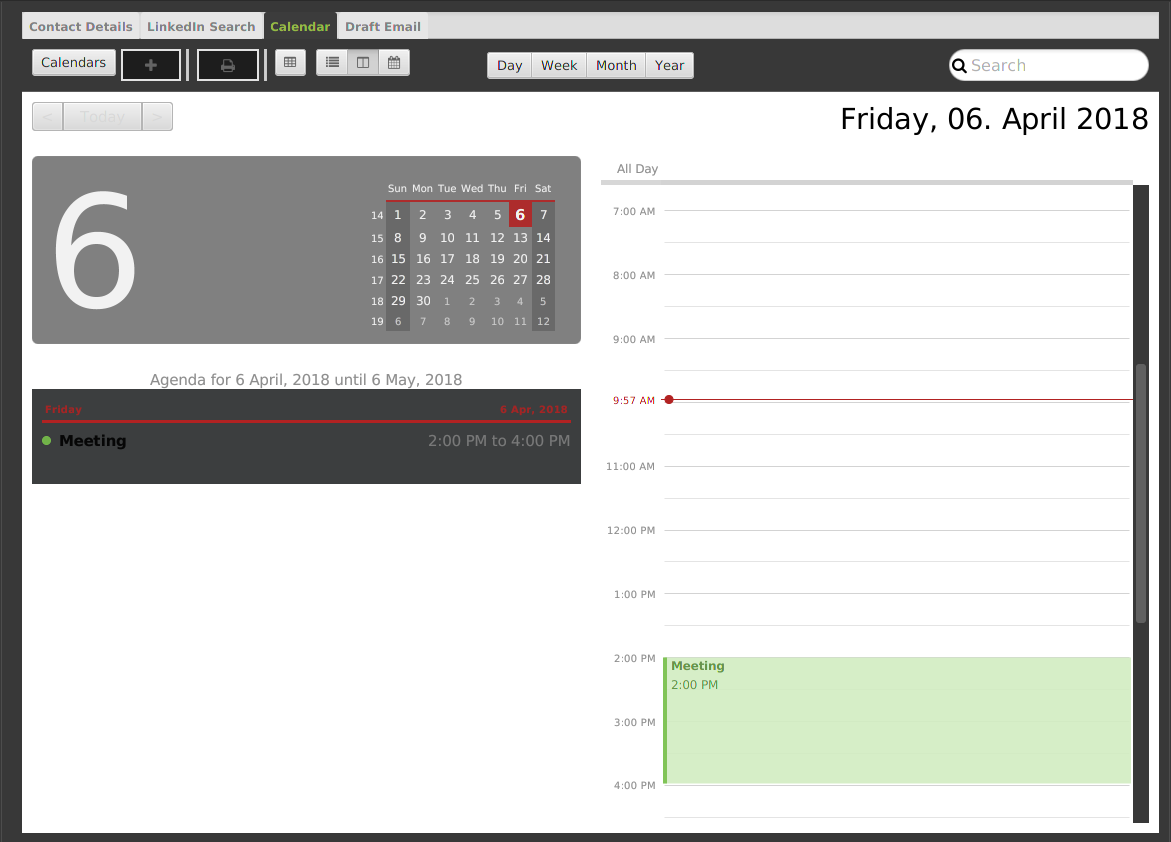
Viewing a specific date and time or switch to the date and time view : datetime
You can view a specifc date time by using the following format.
Format: datetime [DATE_TIME]
DATE_TIME needs to be in format YYYY-MM-DD HH-mm
|
Example: datetime 2018-04-26 12:00
Viewing a specific week or switch to the week view : week
You can view a specifc week or switch to the week view by using the following format.
Format: week [YEAR WEEK]
Year needs to be in format YYYY.Week needs to be in format WW and WW refers to the order of week in one year.
|
-
With
YEAR WEEK, you view the specific week
Example:week 2018 10 -
Without
YEAR WEEK, you change to the week view
Example:week
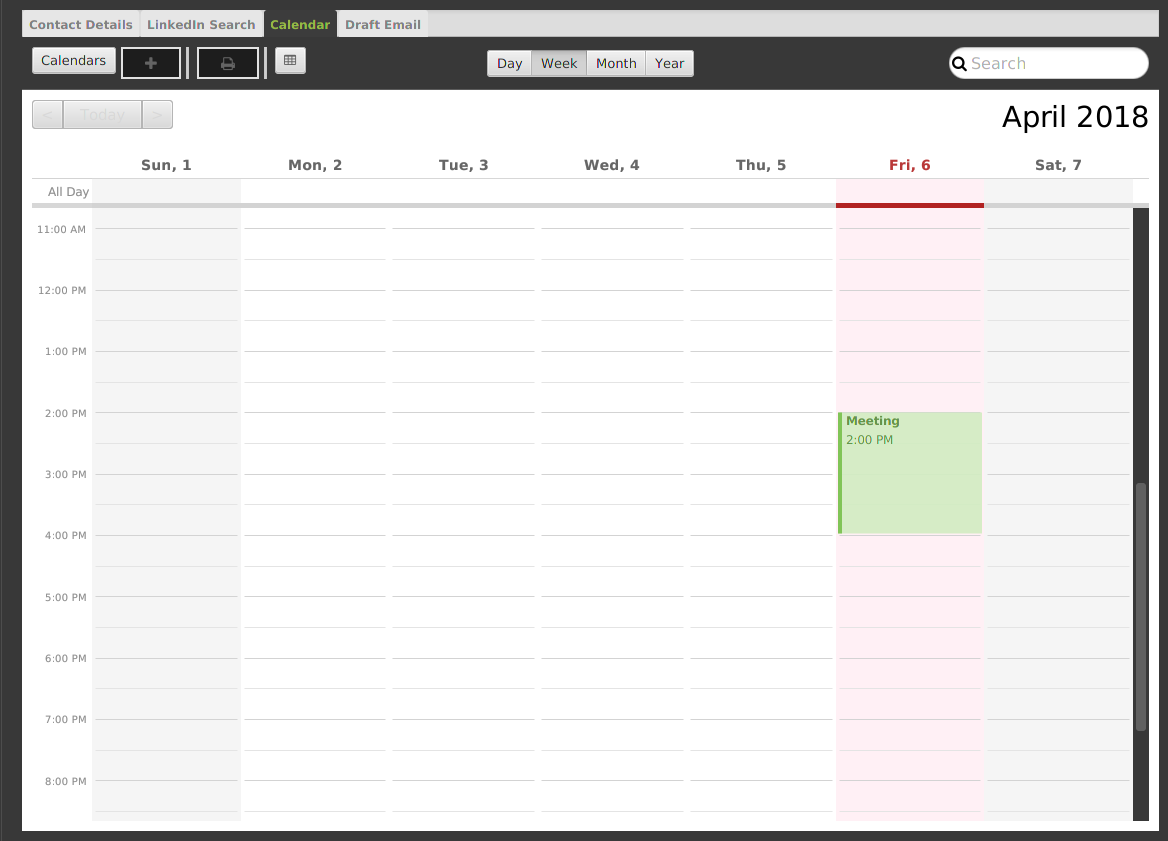
Viewing a specific month or switch to the month view : month
You can view a specifc month or switch to the month view by using the following format.
Format: month [MONTH]
MONTH needs to be in format YYYY-MM
|
-
With
MONTH, you view the specific month
Example:month 2018-10 -
Without
MONTH, you change to the month view
Example:month
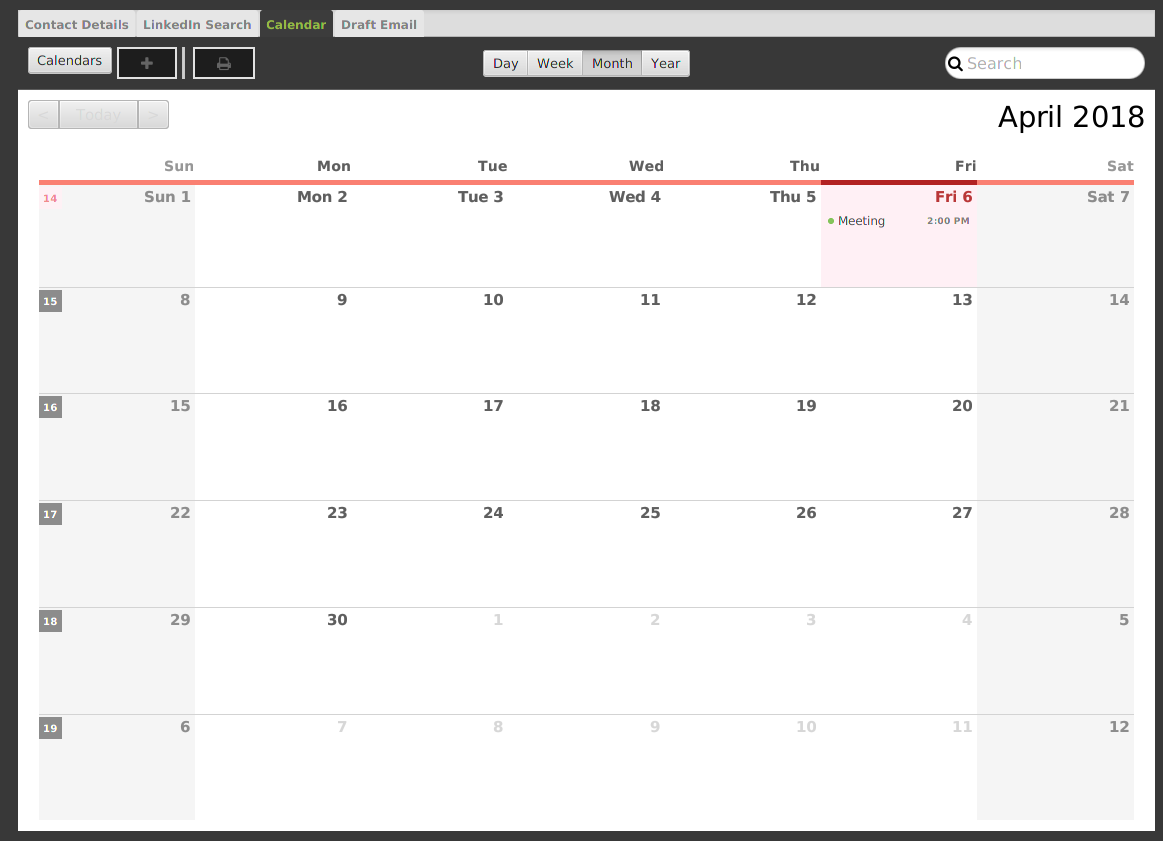
Viewing a specific year or switch to the year view : year
You can view a specifc year or switch to the year view by using the following format.
Format: year [YEAR]
YEAR needs to be in format YYYY
|
-
With
YEAR, you view the specific year
Example:year 2018 -
Without
YEAR, you change to the year view
Example:year
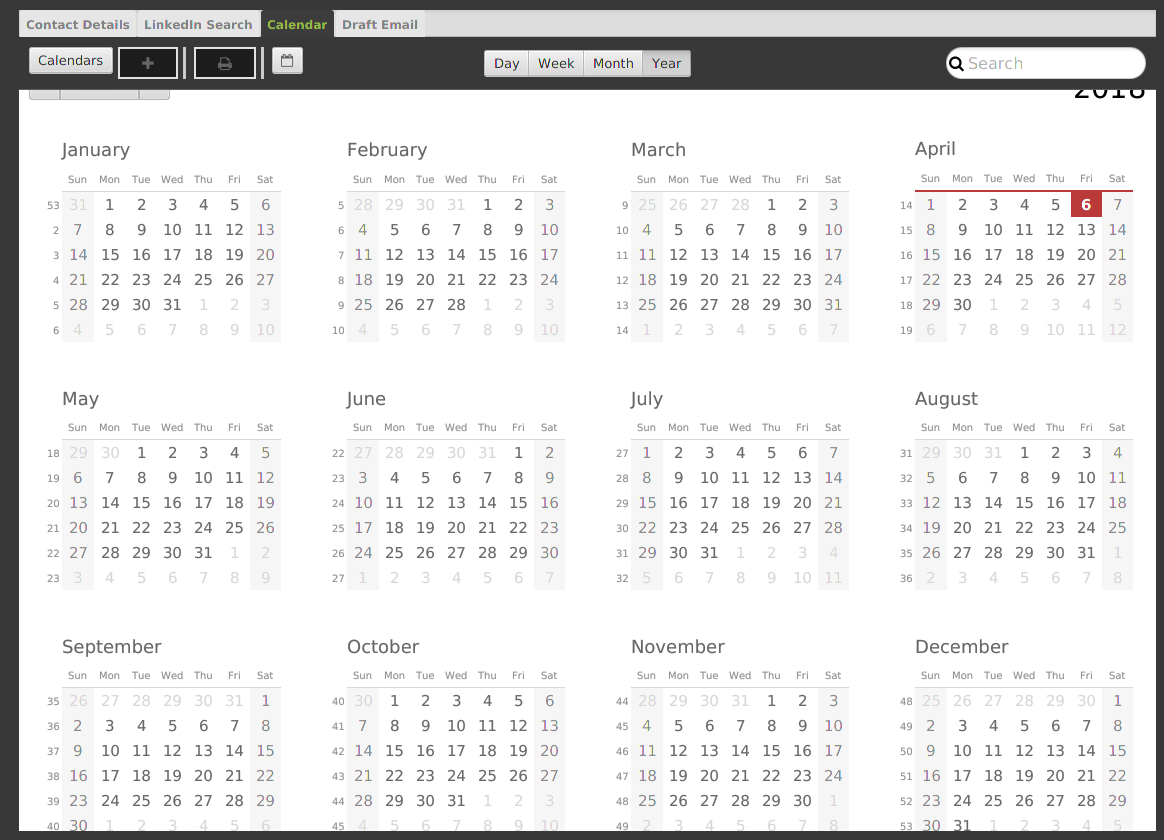
Managing Emails
This section describes the commands you can use to manage emails in contactHeRo
Login to Google : googlelogin
You will have to login to google in order to use features like
emailing. This process is simple and fast like how you would normally login
using the web browser.
Format: googlelogin
Examples:
-
googlelogin
This will open up theGoogletab for you to login. On running the above command, you should see the following success message:Please log in to Google.
You should also see the login screen as shown below.
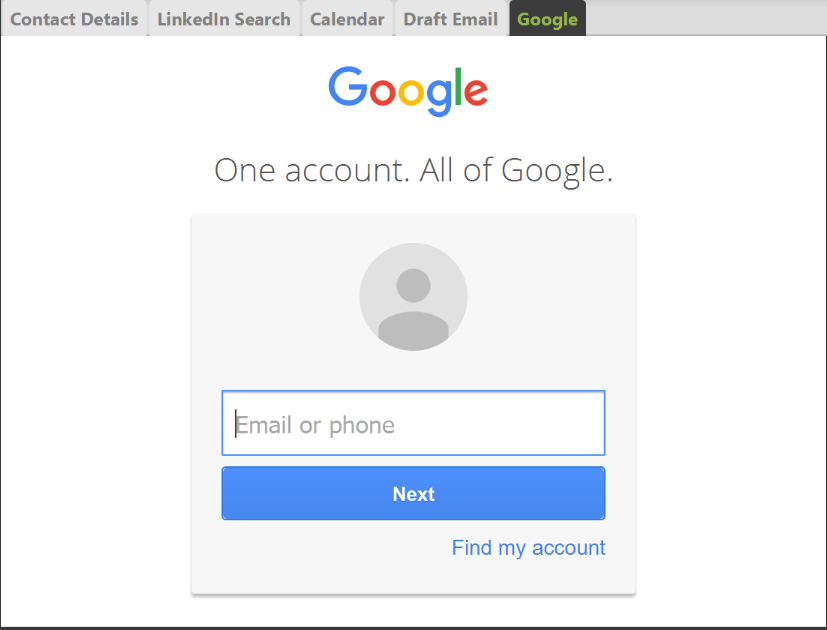
Please do not go to any other webpages in the Google tab after you have logged in.
|
Now that you have logged in, you are ready to use the Email feature to send out emails!
Emailing your contact : email
You can send email to any person you have saved in contactHeRo using the following format.
Format: email INDEX [sub/EMAIL_SUBJECT]
Examples:
-
list
email 2
This will open up the Draft Email tab and then collect the information of the 2nd person in the list. -
list
email 2 sub/Interview on 13 May 2018
This will open up the Draft Email tab and then collect the information of the 2nd person in the list. It will also set the email subject title to "Interview on 13 May 2018".
On running the above commands, you should see similar message like the following:
Drafting email to: berniceyu@example.com
The collected information will be used automatically to fill up details as shown below in figure 5.
If you have also used sub/Interview on 13 May 2018 in the command, the Subject textbox will also be fill with "Interview on 13 May 2018".
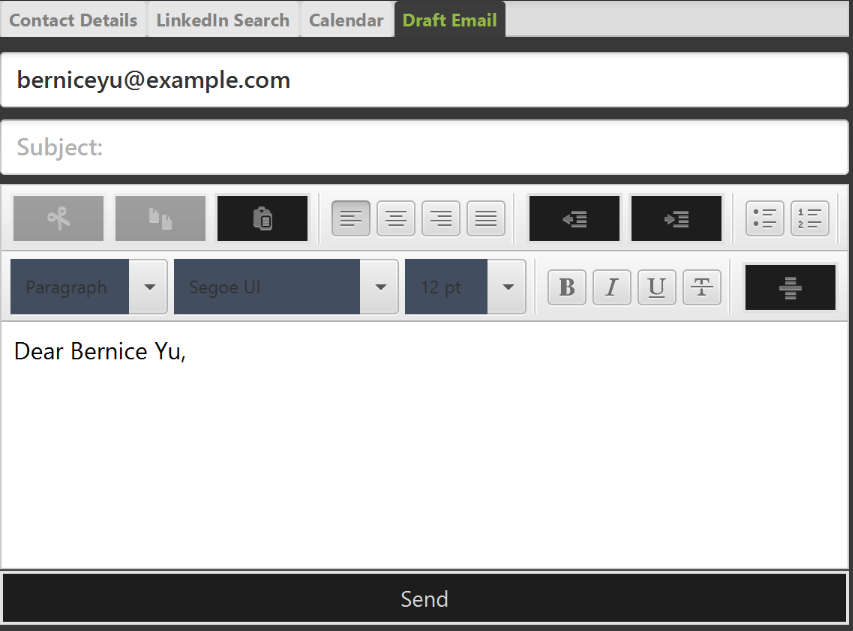
You can use keyboard short-cuts like Ctrl-B to bold your text while drafting
your email.
|
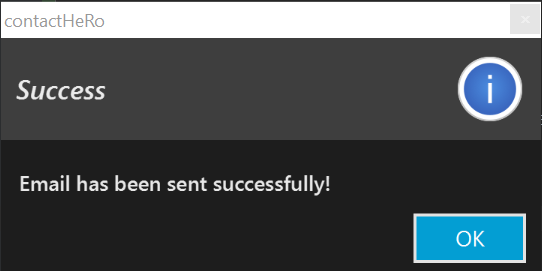
Finally, after you are done drafting up the email, simply hit the Send
button to send your email. If the email is sent successfully, you should see
a pop-up message as shown below.
Utility Features
This section describes the commands that will help you make better use of contactHeRo.
==== Viewing help : help
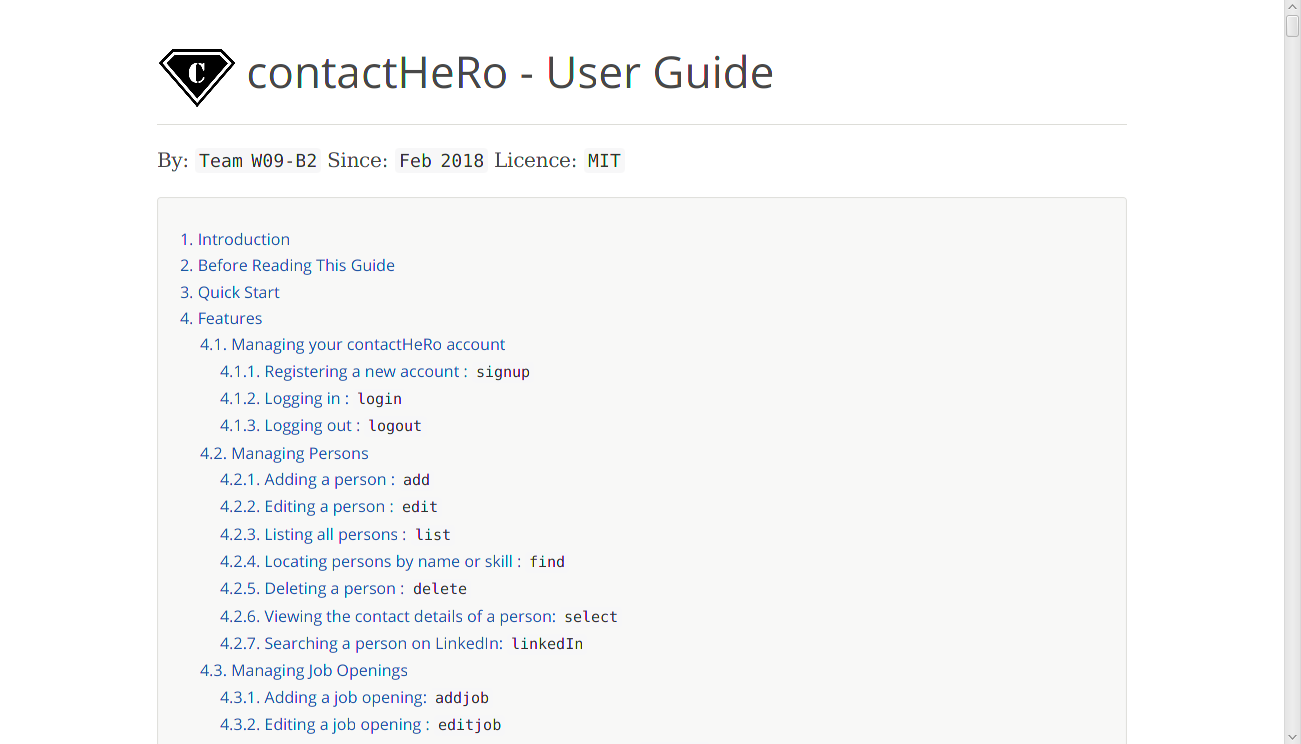
In case you get stuck while using contactHeRo and would like to see the User Guide, you can do so by using the following format.
Format: help
This opens the help window as shown below in figure 3.
Listing entered commands : history
Lists all the commands that you have entered in reverse chronological order.
Format: history
|
Pressing the ↑ and ↓ arrows will display the previous and next input respectively in the command box. |
Clearing list of entered commands : clearhistory
You can clear your history of entered commands using the following format.
Format: clearhistory
On running the above command, you should see the following success message:
Your history has been cleared.
Undoing previous command : undo
You can restore contactHeRo to the state before the previous undoable command(refer to note below) was executed in case you make a mistake or otherwise, using the following format.
Format: undo
|
Undoable commands: those commands that modify the contactHeRo’s content ( |
Examples:
-
delete 1
list
undo(reverses thedelete 1command) -
select 1
list
undo
Theundocommand fails as there are no undoable commands executed previously. -
delete 1
clear
undo(reverses theclearcommand)
undo(reverses thedelete 1command)
Redoing the previously undone command : redo
You can reverse the most recent undo command using the following format.
Format: redo
Examples:
-
delete 1
undo(reverses thedelete 1command)
redo(reapplies thedelete 1command) -
delete 1
redo
Theredocommand fails as there are noundocommands executed previously. -
delete 1
clear
undo(reverses theclearcommand)
undo(reverses thedelete 1command)
redo(reapplies thedelete 1command)
redo(reapplies theclearcommand)
Clearing all entries : clear
You can clear all your contacts from contactHeRo using the following format.
Format: clear
+
On running the above command, you should see the following success message:
contactHeRo has been cleared!
Exiting the program : exit
You can exit the program using the following format.
Format: exit
Auto-complete command
To save your time, after typing a partial command, you can press TAB for the command to be auto-completed.
| The first lexicographically matched command is returned. |
Examples:
-
Typing
adand pressingTABgives:
add n/ e/ a/ [s/]… -
Typing
hand pressingTABgives:
help
Saving the data
You do not need to save manually. contactHeRo saves the data into the hard disk for you automatically.
Coming in V2.0
Arranging meetings with Gmail calendar [coming in v2.0]
You will soon be able to arrange meeting on Gmail calender using contactHeRo.
Setting reminders [coming in v2.0]
You will soon be able to set reminders for meetings, appointments or any other event and contactHeRo will remind you of the event.
Better matching of jobs [coming in v2.0]
Job matching will soon be improved using Artificial Intelligence methods.
FAQ
Q: How do I transfer my data to another Computer?
A: Install the app in the other computer and overwrite the empty data file it creates with the file that contains the data of your previous Address Book folder.
Q: How do I report bugs to the developers?
A: Please send an email to contactHeRo@gmail.com if you find a bug. Thank you.
To ask more questions, please send your email to contactHeRo@gmail.com.
We are willing to help you.
contactHeRo Cheat Sheet
The following sections summarize the commands you can use in contactHeRo.
Managing your contactHeRo account
| Function | Command | Example |
|---|---|---|
Logging in |
|
|
Changing your username |
|
|
Changing your password |
|
|
Logging out |
|
|
Managing Persons
| Function | Command | Example |
|---|---|---|
Adding a person. |
|
|
Editing an existing person. |
|
|
Deleting an existing person. |
|
|
Showing a list of all persons. |
|
|
Finding persons by name. |
|
|
Finding persons by skill. |
|
|
Seeing contact details of a person. |
|
|
Searching a person on linkedIn. |
|
|
Managing Job Openings
| Function | Command | Example |
|---|---|---|
Adding a job opening. |
|
|
Editing an existing job opening. |
|
|
Deleting an existing job opening. |
|
|
Showing a list of all job openings. |
|
|
Finding job openings by position. |
|
|
Finding job openings by location. |
|
|
Finding job openinngs by skill. |
|
|
Matching a job opening to a person. |
|
|
Managing Appointments
| Function | Command | Example |
|---|---|---|
Adding an appointment. |
|
|
Deleting an existing appoinment. |
|
|
Viewing the Calendar
| Function | Command | Example |
|---|---|---|
Opening the calendar. |
|
|
Viewing a specific date or switch to the date view. |
|
|
Viewing a specific date and time or switch to the date and time view. |
|
|
Viewing a specific week or switch to the week view. |
|
|
Viewing a specific month or switch to the month view. |
|
|
Viewing a specific year or switch to the year view. |
|
|
Managing Emails
| Function | Command | Example |
|---|---|---|
Login to google |
|
|
Emailing your contact. |
|
|
Utility Commands
| Function | Command | Example |
|---|---|---|
Viewing help. |
|
|
Listing entered commands. |
|
|
Clearing list of entered commands. |
|
|
Undo previous command. |
|
|
Redo previous command. |
|
|
Clear all data. |
|
|
Exit contactHeRo. |
|
|
Conclusion
Once again, thank you for choosing us as your contact management solution! You are our motivation to make this application better.
If you find any bugs or want to propose any ideas, please contact us via contactHeRo@gmail.com.
Hope you enjoy contactHeRo!
Contributions to the Developer Guide
Given below are sections I contributed to the Developer Guide. They showcase my ability to write technical documentation and the technical depth of my contributions to the project. |
Login System Implementation
Current Implementation
The login system is currently implemented such that there is only one user per application. Logging in and out of contactHeRo is done in the same way as the other commmands which is through the command line.
Logging in
When the user starts the application, the user will see the display screen. The user will need to login in order to switch to the main display to view the data.
Most of the commands will be locked so as to prevent modification of the data in contactHeRo before a user logs in. The commands that are available for use are LoginCommand, HelpCommand, ClearHistoryCommand and ExitCommand.
The user will need to enter the login command to log in before he can get to the main window. The image below shows
the sequence diagram for the login command in the logic component.
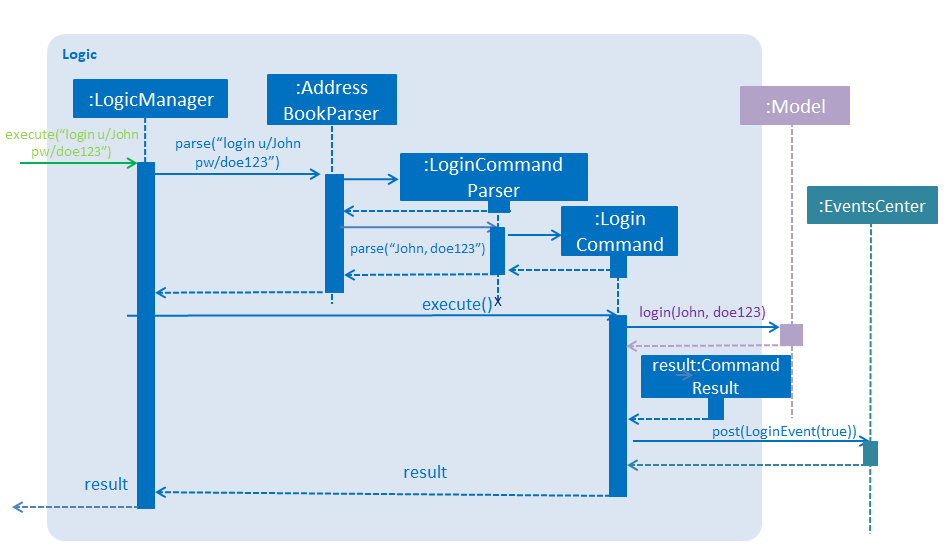
As seen in the image, when the user logs in, an instance of LogicCommand is created which then makes a function call to Model to check the validity of the inputs. Afterwards, the LogicCommand instance will post a LoginEvent to \
EventsCenter and the event will be handled by the UI component to switch the display.
Logging out
When the user is done with using the application, the user can use the LogoutCommand to log out. Once the log out is entered, the user will be brought back to the display screen.
Customizing username and password
Currently, a default username and password is given for first time users of contactHeRo. This information can be seen in the in the ResultDisplayPanel in the display window when the user starts up the application. See the image below.

Users can change the username and password by using the updateusername command and updatepassword command respectively.
| Constraints are set to both username and password to prevent illegal values from being used, such as an empty string. The code snippets for the regex of both username and password are shown below. |
public static final String USERNAME_VALIDATION_REGEX = "\\S\\w{3,20}";public static final String PASSWORD_VALIDATION_REGEX = "(?=.*[A-Za-z])(?=.*\\d)[\\p{Alnum}](\\S{4,20})";Storing of user account
In our implementation, the Account class in the model component stores the in-memory data for the username and password. The AccountsManager class handles the methods which interacts with the data in Account, such as login and update password.
For storing of the user account data in hard disk, it is handled by the XmlAccountData class in the storage component. The data will be stored as an XML file in a JAXB-friendly version XmlAdaptedAccount. This data file is a separate file from the file which stores the main data of contactHeRo.
Design Considerations
Aspect: Storing of user account data
Alternative 1 (current choice): Stores user account data in a separate file.+
Pros: User can still retrieve their data if they forget their customize username or password by simply removing the file storing account data and logging in with their default username and password.
Cons: Data is not very secure as everyone can access the data through the default username and password.
Alternative 2: Stores user account data in the same file with the main data.
Pros: Resolves problem of accessing data from default account.
Cons: Data in contactHeRo becomes lost if user forgets the customized username or password.
Aspect: How login UI is implemented
Alternative 1 (current choice): Use the same window for the display screen and main screen.
Pros: Faster to implement as layout is similar to main screen. Also reduces code duplication.
Cons: Can only do small changes to layout for display screen.
Alternative 2: Create a separate login window.
Pros: Login UI can be customized to make it more user friendly for users visually.
Cons: User do not have to deal with the opening and closing of windows which may slow the app.
Matching jobs implementation
Current Implementation
The JobMatchCommand uses PersonSkillContainsKeywordsPredicate to match person’s skills with a job’s skills. It accepts the index for the job to match and then uses the PersonSkillMatchesKeywordsPredicate to match the job. Below is the code for the execution of the JobMatchCommand:
@Override
public CommandResult execute() throws CommandException {
    ...
    Job jobToMatch = lastShownList.get(targetIndex.getZeroBased());

    model.updateFilteredPersonList(new PersonSkillContainsKeywordsPredicate(
            CollectionUtil.getSetAsStringList(jobToMatch.getSkills())));
    // return result
}
PersonSkillMatchesKeywordsPredicate takes in the list of skills of the job as the keywords as the parameter and then checks if the person has any of these skills using the SkillUtil. The code for matching the skills is as follows:
/**
 * Checks if a set of skills contains any of the {@code keywords}.
 */
public static boolean match(List<String> keywords, Set<Skill> list) {
    String skillList = getSkillsAsString(list);
    return keywords.stream()
            .anyMatch(keyword -> StringUtil.containsWordIgnoreCase(skillList, keyword));
}
To minimize code duplication, we made a utility class SkillUtil which is used both by PersonSkillMatchesKeywordsPredicate during execution of matchjob and find s/ commands and JobSkillMatchesKeywordsPredicate during the execution of findjob s/ command.
|
Proposed Enhancement
-
Add data encryption feature to further improve the security of the data in contactHeRo.
-
Add shortcut keys to scroll through the list of data in contactHeRo to make it more user-friendly.